Unreal Engine Niagara Tutorials | Sword Hit Effect

Unreal Engine Niagara Tutorials | Sword Hit Effect

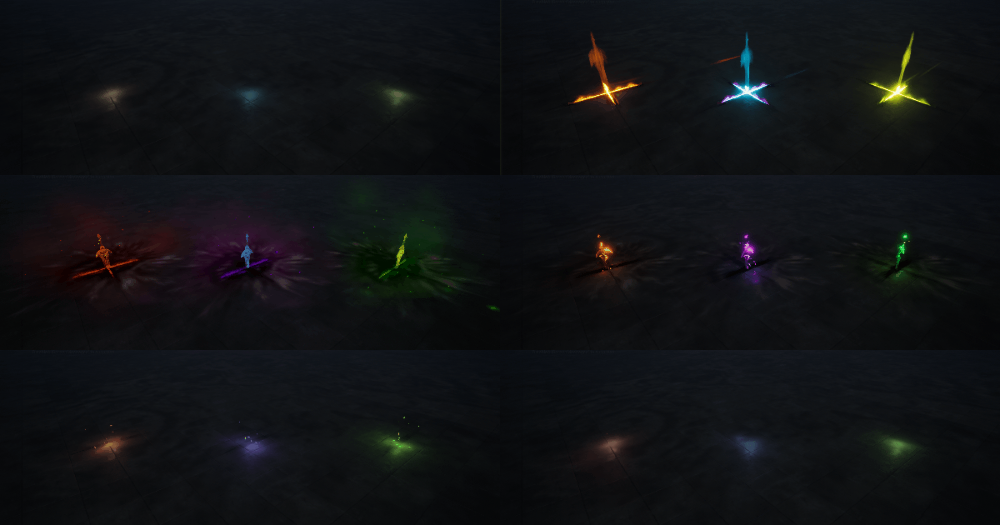
In this tutorial you will learn how to create Sword Hit Effect in unreal engine. you will learn every step for this effect texture, materials, mesh and emitters. For any concern comment below the video or create help thread in CGHOW form (discussion & help forum link below)

#cghow #unrealengine #gamevfx #gamefx #ue4vfx #ue4fx #niagara #unrealengineniagara #unrealenginevfxtutorials

●Upload Your Tutorials/Work – https://cghow.com/
…………………………………………………………………………………………………………
Purchase Effect Package From Unreal engine Marketplace –
●Niagara Effects Pack – http://bit.ly/2LWgZTx
●Advanced Magical FX – http://bit.ly/2XQYyXL
……………………………………………………………………………………………………………………………………
●Patreon – https://www.patreon.com/Ashif
……………………………………………………………………………………………………………………………………

●Follow FB Page – https://www.facebook.com/cghow0/
●Join FB Group – https://www.facebook.com/groups/cghow/
……………………………………………………………………………………………………………………………………
●Android App – http://bit.ly/2XUnhoR
……………………………………………………………………………………………………………………………………
Playlists-
●Unreal Engine Niagara Tutorials – http://bit.ly/2SmPEuT
●Unreal engine VFX Tutorials -http://bit.ly/2JNXyJZ
●Unity VFX Tutorials – http://bit.ly/2XNGlKz
……………………………………………………………………………………………………………………………………
●Discussion & Help Forum – http://bit.ly/2Lo0Er7
……………………………………………………………………………………………………………………………………

Video Transcript: Hard Hit Effect in Niagara

Hello everyone, I’m Asif Ali and you’re watching a CGHOW video. Today, I’ve created this hard hit effect using Niagara. Let’s check out how I created it.

[Music]

First of all, please subscribe to my channel and click on the bell icon to receive notifications of all my new videos. Also, support me on Patreon — the link is in the description. You can go to patreon.com/AsifAli. My two goals are:

  1. When I reach 200 patrons, I’ll start sharing all my video content, as many of my subscribers have requested.
  2. When I reach 500 patrons, I’ll quit my job and make full tutorials, step by step. There will be no more breakdowns, only complete tutorials. So, support me to help me achieve these goals.

Now, let’s talk about the effect. I created three variations of it: red, blue, and purple. I’ll show you the middle one, the blue effect, and you can easily change it to create variations of your own. I’ll just turn off the red and purple versions, leaving just the blue.

Here are the emitters in the effect:

  1. Cut Effect: This is the first emitter, creating the hard impact on the surface.
  2. Cut Smoke: This is similar to the cut effect but adds smoke.
  3. Cut to (duplicate): A rotated version of the first cut effect.
  4. Flash: Adds a bright flash at the moment of impact.
  5. Flash 2: Adds an additional flash with a 3D effect.
  6. Mark on Ground: Creates a mark on the ground where the impact happens.
  7. Shockwave: Simulates the shockwave from the hit.
  8. Sparks: Adds sparks from the impact area.

Detailed Breakdown of the Emitters:

  1. Cut Effect:
    • Uses a Planar Mesh and a custom material.
    • The material uses a noise texture to simulate a jagged edge and adds particle color for opacity.
    • The particle properties are constant life (3.3), scale size (10x10x10), no rotation on the axes, and color transitions from blue to black.
  2. Cut Smoke:
    • This is a duplicate version of the first cut effect but with added smoke using Sub UV for animation.
    • I created this in Maya by simulating smoke with a fluid container and rendering it out.
    • The particles are spawned with a constant life, and the color transitions to a purple hue.
  3. Cut to:
    • A rotated version of the cut effect with the same material and texture as the original cut but with slight rotations to make a cross pattern.
  4. Flash Effect:
    • Uses a texture on a planar mesh, emitting 20 particles with random lifespans.
    • The color transitions from yellow to purple, and the opacity fades over time.
  5. Flash 2:
    • A more 3D flash effect where the plane rotates on every axis, giving it a more dynamic appearance.
  6. Mark on Ground:
    • A simple planar mesh creates a mark on the ground with a special texture and normal map.
    • The color starts blue and fades to gray.
  7. Shockwave:
    • Uses a Sprite with a scaling life curve and flat alignment on the ground.
    • The color is blue, and the size scales over the life of the particle.
  8. Sparks:
    • Sparks are emitted from the impact area, using radial ramps and light effects.
    • The color transitions from blue to purple, and the velocity is spread outward from the center with drag and random movement.
  9. Sparks 2:
    • Similar to the first sparks emitter but with black coloration for variation.
  10. Sparks for Glow:
    • A glow effect with stretched sprites that scale down over time. This effect uses a very low alpha value for the glow.
  11. Word Effect:
    • A mesh is used to simulate text coming from above and eroding upon impact.
    • The material for erosion uses a subtraction method to create glowing edges.

Particle Systems:

  • For the Velocity Particle, I’m using random life and size, stretching the particles on the Y-axis.
  • The Erode effect is created by subtracting values from the mesh to create an eroded look over time.

This particle system is designed to handle multiple colors, and I showed how you can create different color versions (red, blue, purple) just by modifying a few values in the Niagara system.


Conclusion: I hope you enjoyed this tutorial and learned something new. If you have any queries, feel free to comment below. Don’t forget to suggest more effects, share my videos, like them, and support me on Patreon and YouTube. Keep learning, and thanks for watching!

Ashif Ali

I am Ashif Ali, Real-Time VFX Artist, I make Unreal Engine Niagara Tutorial on this channel. I've made it my mission to share my knowledge and expertise with the world through my YouTube channel. So why not join me on this exciting adventure? Follow me on my social links, subscribe to my channel, and support my growth as a creator. Together, we can create amazing things and take our skills to new heights. And who knows, you might even get access to some of my exclusive files for free!

Recent Posts

Abyssal Rupture in Unreal Engine 5 Niagara

https://youtu.be/XFv0kxFyy7A Full Video - https://youtu.be/QTFPRWQVW00This is showcase video of a VFX tutorial i has already…

1 hour ago

UEFN VFX Tutorial | Make MUZZLE FLASH (UE6 Ready) 💥

https://youtu.be/vLZjeXr-wtI Full Tutorial - https://youtu.be/EMkUvMUTe80In this UEFN VFX tutorial, learn how to build an impactful,…

1 day ago

Shield Aura VFX in Unreal Engine 5 Niagara – Game-Ready Tutorial

https://youtu.be/LTwOZBko830 In this video, I showcase a completely revamped, cleaned-up, and optimized Shield Aura VFX…

5 days ago

Magical Aura VFX in Unreal Engine 5 Niagara – Remastered Tutorial

https://youtu.be/qL3cjAclffw In this video, I showcase an updated and optimized Magical Aura Effect created in…

6 days ago

Magical Aura Burst VFX in Unreal Engine 5 Niagara – Blueprint Setup

https://youtu.be/yhjWyNIQXYk In this video, I showcase an upgraded and remastered Magical Aura Burst Effect in…

1 week ago

UEFN VFX Tutorial | How to Create FALLING LEAVES (UE6 Ready) 🍃

https://youtu.be/hMT0gl0x80E Tutorial - https://youtu.be/bLbbt8cWQd0In this UEFN VFX tutorial, learn how to create a high-quality, Stylized…

2 weeks ago