
Download – https://www.patreon.com/posts/67706593
NFT – https://opensea.io/CGHOW
Twitter – https://twitter.com/cghow_
👉👉 If you Liked it – http://bit.ly/2UZmiZ4
Channel Ashif – http://bit.ly/3aYaniw
Support me on – https://www.patreon.com/Ashif
Support me on – paypal.me/9953280644
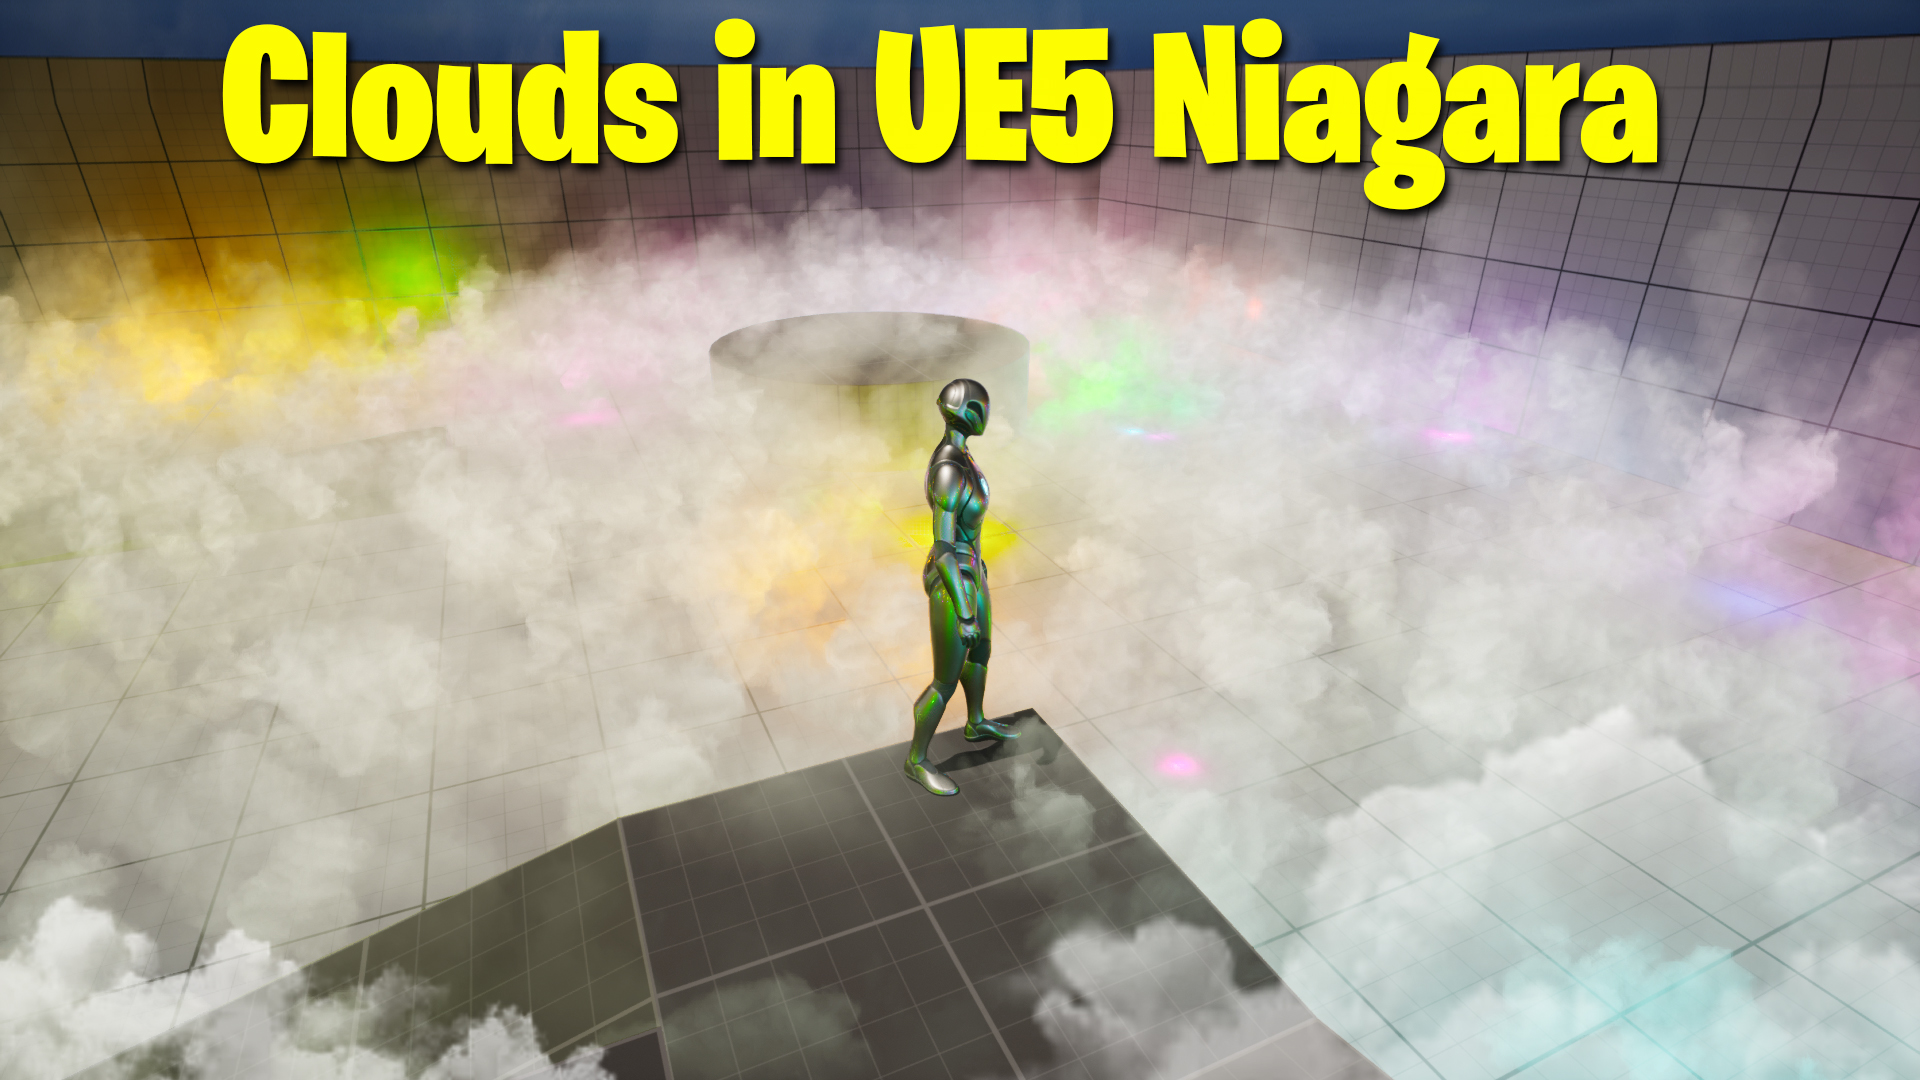
Clouds in UE5 Niagara Tutorial | Download Files
#cghow #UE5 #UE4Niagara #gamefx #ue5niagara #ue4vfx #niagara #unrealengineniagara #realtimevfx
●Upload Your Tutorials/Work – https://cghow.com/
Purchase Effect Package From Unreal engine Marketplace –
Unreal Engine Niagara Effects in Marketplace – https://youtu.be/DF4Lb_btEus
Niagara Effects Pack in Marketplace – https://youtu.be/g6_k8T7FqHA
Unreal Engine Advanced Magical Effects in Marketplace – https://youtu.be/0Dn3GLIzhMo
Smoke in UE4 Niagara Pack01 in Unreal Engine Marketplace – https://youtu.be/38BPA_9yqJ8
UE4 Niagara Fire Pack 01 in Marketplace – https://youtu.be/PW5FL-zZoP4
UE4 Niagara Fire Pack 02 in Marketplace – https://youtu.be/fdLXPlUEzxM
UE4 Niagara Explosions Pack 02 in Marketplace – https://youtu.be/dj-XX9he4aE
Unreal Engine Niagara Effects Pack 03 in Marketplace – https://youtu.be/0kKon43I-Og
Slow Motion Explosion in UE4 Niagara Pack 04 in Marketplace – https://youtu.be/lUK1eW5zRP0
Unreal Engine Niagara Effects pack 04 in Marketplace – https://youtu.be/MihWYB31Gi4
Slow Motion Explosion in UE4 Niagara Pack 04 in Marketplace – https://youtu.be/lUK1eW5zRP0
UE4.25 Niagara Effects Pack 05 in Marketplace – https://youtu.be/sn1HIENVTDI
UE4.25 Niagara Effects Pack 06 in Marketplace – https://youtu.be/pvH_xGQ5jvs
Explosions Package in Unreal Engine Niagara Particle System – https://youtu.be/1mbqWscjUJ4
●Follow FB Page – https://www.facebook.com/cghow0/
●Join FB Group – https://www.facebook.com/groups/cghow/
●Android App – http://bit.ly/2XUnhoR
Playlists-
●Unreal Engine Niagara Tutorials – http://bit.ly/2SmPEuT
●Unreal engine VFX Tutorials -http://bit.ly/2JNXyJZ
●Unity VFX Tutorials – http://bit.ly/2XNGlKz
Video Title:
Create Stunning Cloud Effect in Unreal Engine 5 Niagara – Updated Tutorial
Description:
In this updated tutorial, Asif Ali walks you through the process of creating a realistic cloud effect using Unreal Engine 5’s Niagara system. Based on requests from subscribers, this new version is optimized for UE5 and incorporates the latest Niagara changes. Learn how to use smoke textures, velocity, and particle animations to create lifelike clouds in your project!
Key Points Covered:
- Setting Up a Cloud Effect: Learn how to use the smoke texture and adjust its settings for realistic results.
- Creating Dynamic Movement: Apply random velocity and curl noise to give the clouds natural motion.
- Adding Rotation and Variation: Add rotation rates and randomize spawn rates to create variation in the cloud effect.
- Optimizing for GPU: Use GPU particles to handle a large number of particles efficiently.
- Bonus – Adding Light: Learn how to add a light source to enhance the realism of your cloud effect.
Step-by-Step Guide:
- Create a New Project:
- Start with a Third-Person Template and Starter Content to easily access the smoke texture and material.
- Setting Up the Niagara Emitter:
- Right-click to create a Niagara Emitter, choose Fountain, and name it Cloud.
- Apply the smoke material from the Starter Content (8×8 texture), and adjust its frame count to 64 for smooth animation.
- Configure Cloud Movement:
- Set up Linear Velocity in the Shape Location module and adjust for randomness along the X, Y, and Z axes.
- Enable Local Space to keep the particles in a fixed world position.
- Adjusting Particle Size:
- Initially, the particles will be too small. Increase the size to around 4000 to make them more visible.
- Use a User Parameter to further fine-tune the size across different axes (X, Y, Z).
- Enhancing Realism with Velocity & Noise:
- Add Curl Noise to introduce some turbulence to the cloud movement.
- Fine-tune velocity and curl noise values (e.g., velocity 100, curl noise 50) for a more dynamic effect.
- Rotation and Alpha Variations:
- Add Rotation Rate to the particles and adjust spawn rates for more variation.
- Modify the alpha value to control transparency, allowing for a soft fade-out effect.
- Create a Layered Cloud Effect:
- Copy and paste the emitter, adjusting the spawn rate and size to create layered clouds.
- Position the spawn locations above or below to create variation.
- Optional – Adding Light to the Effect:
- Duplicate the emitter, disable GPU rendering, and replace the Sprite Renderer with a Light.
- Randomize the light color and adjust the light size and intensity to simulate lighting effects.
- Adjust Smoke Material:
- In the smoke material, switch to Surface Forward Shading for better lighting interaction, and save the changes.
Final Settings (For Reference):
- Particle Size: 3200 (X, Y), 200 (Z)
- Velocity: 100 (X), 20 (Y), 5 (Z)
- Curl Noise Strength: 50
- Alpha: 0.2 (for secondary layer)
- Rotation Rate: 50 (uniform)
- Light Settings: Random color, intensity 1000-10,000
Conclusion:
With these steps, you can create a highly customizable and realistic cloud effect in UE5 Niagara. Don’t forget to experiment with the settings to fine-tune the appearance and behavior of your clouds. If you want to add lighting or other effects, feel free to explore the options discussed.
Thanks for watching! Make sure to subscribe for more tutorials and keep learning.
Leave a Reply