

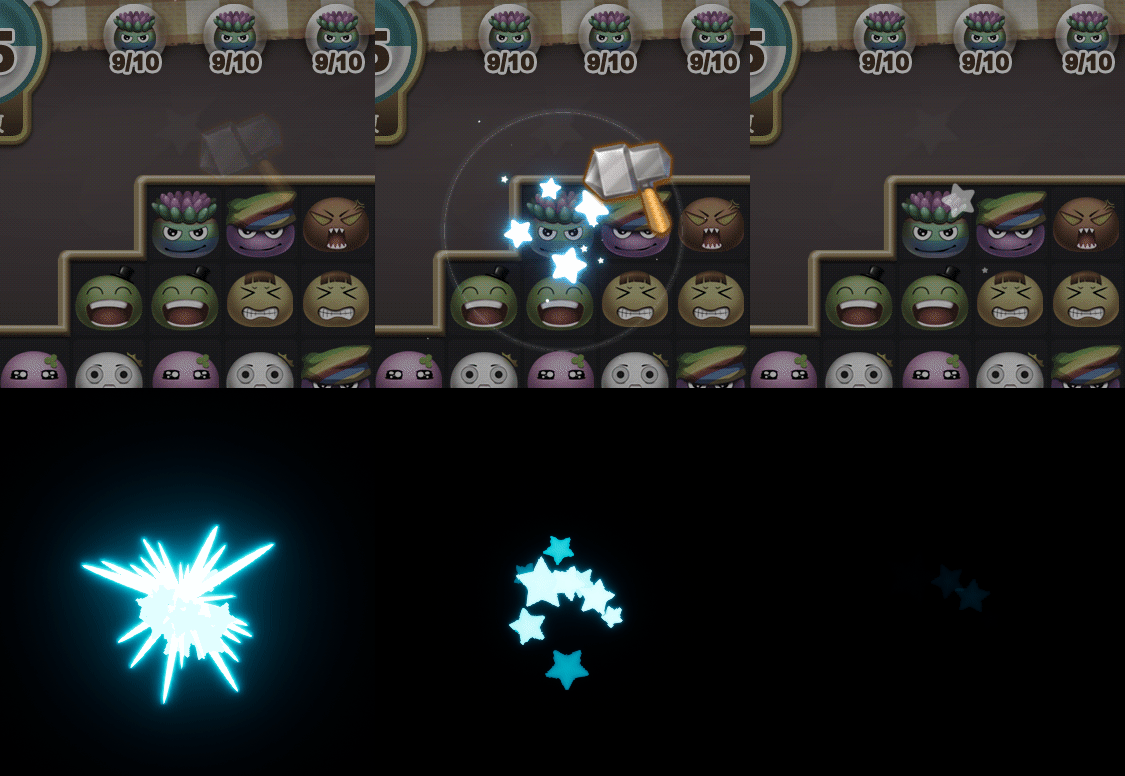
Original Effect- https://www.artstation.com/artwork/XmdWY
My new Channel – http://bit.ly/3aYaniw
Support me on – https://www.patreon.com/Ashif
Support me on – paypal.me/9953280644
Hi, guys today I have created this simple effect from scratch in ue4 Niagara.
#cghow #RealtimeVFX #UE4Niagara #gamefx #ue4vfx #ue4fx #niagara #unrealengineniagara #unrealenginevfxtutorials
●Upload Your Tutorials/Work – https://cghow.com/
Purchase Effect Package From Unreal engine Marketplace –
Unreal Engine Niagara Effects in Marketplace – https://youtu.be/DF4Lb_btEus
Niagara Effects Pack in Marketplace – https://youtu.be/g6_k8T7FqHA
Unreal Engine Advanced Magical Effects in Marketplace – https://youtu.be/0Dn3GLIzhMo
Smoke in UE4 Niagara Pack01 in Unreal Engine Marketplace – https://youtu.be/38BPA_9yqJ8
UE4 Niagara Fire Pack 01 in Marketplace – https://youtu.be/PW5FL-zZoP4
UE4 Niagara Fire Pack 02 in Marketplace – https://youtu.be/fdLXPlUEzxM
UE4 Niagara Explosions Pack 02 in Marketplace – https://youtu.be/dj-XX9he4aE
Unreal Engine Niagara Effects Pack 03 in Marketplace – https://youtu.be/0kKon43I-Og
Slow Motion Explosion in UE4 Niagara Pack 04 in Marketplace – https://youtu.be/lUK1eW5zRP0
Unreal Engine Niagara Effects pack 04 in Marketplace – https://youtu.be/MihWYB31Gi4
Slow Motion Explosion in UE4 Niagara Pack 04 in Marketplace – https://youtu.be/lUK1eW5zRP0
UE4.25 Niagara Effects Pack 05 in Marketplace – https://youtu.be/sn1HIENVTDI
UE4.25 Niagara Effects Pack 06 in Marketplace – https://youtu.be/pvH_xGQ5jvs
Explosions Package in Unreal Engine Niagara Particle System – https://youtu.be/1mbqWscjUJ4
●Follow FB Page – https://www.facebook.com/cghow0/
●Join FB Group – https://www.facebook.com/groups/cghow/
●Android App – http://bit.ly/2XUnhoR
Playlists-
●Unreal Engine Niagara Tutorials – http://bit.ly/2SmPEuT
●Unreal engine VFX Tutorials -http://bit.ly/2JNXyJZ
●Unity VFX Tutorials – http://bit.ly/2XNGlKz


Video Title: Creating a Hammer Impact Effect from Scratch in Unreal Engine
Intro:
- “Hello guys, I am Asif Ali, and you’re watching CGHOW. Today, I’m going to create this hammer impact effect from scratch in Unreal Engine. Let’s dive into how I made it!”
Pre-Video:
- “Before we begin, make sure to subscribe to my YouTube channel and hit the bell icon to get notifications for all my new videos.”
Inspiration:
- “I got inspired by a cool hammer impact effect from a Chinese game, which is similar to Candy Crush. Check out the original effect on the channel Hyt. I’ll drop a link to the channel in the description.”
Tools Used:
- “For this tutorial, I’ll show you how to use a helpful Chrome add-on called ‘GIF Scrubber.’ It allows you to view GIFs frame by frame, helping us understand the effect in detail.”
Creating the Effect – Part 1:
- “Let’s start by creating the materials. For the textures, I’ll use some pre-made star and ring textures. If you don’t have them, I’ll guide you on how to make them in Photoshop.”
- Photoshop Tip:
- “To create a star texture, you can use a custom shape in Photoshop, and by using blending options like a stroke and gradient, you can give it depth. You can also erode the shape to get a fading effect by adjusting the level settings.”
- “For rings, I use the same method with a blurred layer and then create a gradient effect for more depth.”
- Texture Tip: “I’ll show you how to import these textures into Unreal Engine and apply them to materials like Ring1 and Ring2 with emissive and opacity settings.”
Creating the Effect – Part 2:
- “Now let’s set up the Niagara effect. I’ll create a new emitter for the impact effect.”
- “I use two ring particles: one sharp and one blurred. These particles will overlap and fade out.”
- “In the emitter, I’ll adjust the spawn rate, burst count, and material to match the visual I want. For better control, I’ll adjust the random size and use uniform values for particle scaling.”
- “I’ll add a short life span to make sure the particles fade out properly.”
Advanced Tweaks:
- “To get the glowing effect around the impact, I duplicate the spark material and use an additive blending mode for a soft glow.”
- “For the star material, I use a radial mask to make sure the particles are sharp. Then, I fine-tune the spawn rate and randomize their sizes for a more dynamic look.”
Finalizing the Effect:
- “Now, to refine the behavior of the stars and rings, I’ll tweak the drag and add rotation to the stars. I’ll also make sure the particles fade out and die at the right time.”
- “For a final touch, I adjust the particle’s Y velocity to simulate how they stretch out and shrink into dots.”
Conclusion:
- “That’s it! You now have a fully customizable hammer impact effect created from scratch. I hope you found this tutorial helpful. If you have any questions, feel free to comment below the video.”
- “Don’t forget to subscribe to my YouTube channel, CGHOW, for more VFX tutorials. Keep learning and creating. Thanks for watching, and see you in the next video!”
Leave a Reply